Tutorial: Faking Acrylic Nails

Hey everyone!

One of my favorite things to do is paint my nails. If I’m being perfectly honest, when I’m doing my nails I am overcome by a sense of peace. And no, it’s not the horrible smell of acetone but it’s the fact that when I’m painting my nails, I don’t focus on anything else.

So today I am going to show you ladies how I shape, protect, and paint my nails to look acrylic without sacrificing my nail health.

To start off, I like to remove all nail polish with remover that has vitamins as well as gelatin to promote nail strength.

After my nails are free of any polish, this is when I really focus on the shape of my nails. Although I tend to shape my nails squarely, you can file yours to be oval shaped, rounded, or even pointed. For a perfect square however, I start by trimming my nails down with clippers in a straight, even cut across the tip of each nail. By cutting each nail in a straight line, you can create the foundation for a square shaped nail.


Next, I take my favorite nail file and like the previous step, I file directly across my nail to smooth any jagged edges and make each nail perfectly geometric.

Before I apply my first coat, I use a buffing file to smooth away any imperfections that my nails might possess.

If my nails are looking weak, before I apply my first color coat, I apply a clear, nail strengthening polish to protect and stimulate nail growth. The one I am using today is OPI’s ‘Natural Nail Strengthener’.

Now that my nails are shaped and protected, I can finally begin to color my nails. Today I decided to use one of the most beautiful reds in my polish collection call ‘Hip-Anema’ by Essie. I also love that whenever I use the nail polish, I can’t help but hum “The Girl from Ipanema”.

DSCN5699

With my first coat, I make sure it is ultra this so that it can dry fast as well as smooth over any annoying bubbles on my nail (for some reason I always used to end up with a super annoying gritty texture on my nails). To apply each coat, I place the nail polish brush at the base of my nail and slowly bring the paint to the top of my nail. After the first coat has dried, I then apply a bit of a thicker second layer of polish to enhance the color and create a hyper-glossy nail.

Once all of my nails have dried, I like to top off my nails with Essie’s ‘Good to Go’ topcoat. Not only does this make my nails dry faster, it gives my nails a shine that gives the illusion of an acrylic nail and it makes each manicure last much longer.

DSCN5723DSCN5720

So I hope you all enjoyed this post and found it helpful! I know I live by this routine and I can’t wait to share more with you all soon.

XOXO,

N

Summer Lookbook

Happy summer!

To start off this fresh new blog as well as the summertime season, I’ve decided to devote this post to three versatile looks for any occasion you may have this summer. So without further a do, here are three of my all time favorite summer outfits! I hope you all love these looks as much as I do!

Look No. 1: Let’s go to the Beach

DSCN5599

Romper: Pacsun           Necklaces and Earrings: Francesca’s Collections

Cardigan: H.I.P              Rings and Sunnies: Nordstrom BP         Flip Flops: Dolce Vita

Bag: Long Champ Le Pliage

I love that this look is both a combination of boho and beachy. With the romper adding the bohemian pattern that I love and the cardigan providing a fluidity to the look that will cause it to drift with the wind, this look is perfect for a night on the boardwalk or even a walk on the beach.

To accessorize, I added my jewelry staples that I add to almost every outfit of mine. I absolutely love layering separate dainty, gold necklaces with my geode ring and large diamond studs, to make a simple cardigan and romper come to life.

To finalize this outfit, I added my Dolce Vita sandals that have yet another hint of gold in addition to my favorite sunnies and my go to Long Champ tote.

Look No. 2: Summer Nights

DSCN5616

Top: Nordstrom BP               Shorts: Brandy Melville             Sandals: Sam Edelman

Cross-body and Jewelry: Francesca’s Collections             Bracelets: Alex and Ani

This look is definitely one of my go to outfits for any outing in the summer. Whether I am going to the movies, dinner, shopping, or just hanging out with friends, this look is not only comfortable, it is stylish as well. To recreate this look, any mock neck paired with patterned shorts and layered necklaces and bracelets would make any outfit fit for a night out.

Look No. 3: Summer Wedding

DSCN5642

Dress: Topshop              Heels and Long Necklace: Nordstrom BP

Accessories: Francesca’s Collections

As a petite individual, I always have a difficult time finding dresses that fit but with this Topshop shift dress, I don’t have to sacrifice style for length. I also adore how the color is so lively and perfect for summertime. To complete this minimalist look, I added some of my favorite necklaces including a longer one to draw the eye down and create a longer illusion. And can we talk about these heels? I absolutely love, love, LOVE the style of this classic shoe but I didn’t have to empty my entire wallet to purchase them. They also come in a ton of different colors that are all equally as gorgeous.


So those are all of my summer faves! I hope you all enjoyed this post and I can’t wait to share more with you soon.


XOXO,

N


Three Tiered Easter Cake

Hey everyone!

Although it is summer, I really wanted to share one of my favorite and most spectacular baking feats yet.

This past Easter, I really wanted to create a memorable pastry that could not only serve my family and friends, but could reintroduce my taste buds to baked goods (I gave up ALL sweets for lent). Desperate for more sugar in my life, I decided to create a multi tiered cake.

Although I was a little apprehensive as to whether or not I could successfully create such a large (and rather overwhelming) cake, I decided to just go for it.

So I started this cake by sitting down and planning how I would bake and decorate this cake. For the cake, I decided I wanted to use my absolute favorite chocolate cake recipe. With this recipe, the use of buttermilk, coffee, and semi-sweet chocolate create a cake that is dense and packed full of rich flavor. I originally came across this recipe on Pinterest and after I did, my idea of how a chocolate cake should taste was changed. For more info on this cake I am going to write a separate post on my recreation of this confection and feel free to check out the recipe here!

After choosing what flavor I wanted the cake, I doubled the recipe and divided the batter into a six inch round, an eight inch round, and a ten inch round to create three different tiers.

Finally, to decorate, I decided I wanted to base the cake on an Easter classic: Robin Eggs! These pastel speckled eggs scream Easter to me and I really wanted the cake to look like one giant Robin Egg. So to achieve this, I made vanilla buttercream, dyed it the color of a pale, blue Robin Egg, and splattered the cake with a mixture of vanilla extract and dutch processed cocoa to make the cake look like one giant, speckled Robin Egg. To finish the cake I (quite generously) added different colored Robin Eggs all over the cake.

DSCN4460

Now don’t get me wrong, I was definitely overwhelmed by the size of this cake. While decorating the cake I got easily stressed in an effort to make the buttercream look smooth on the cake and prevent chocolate cake crumbs from mixing in with the frosting. But once I added the finishing touches of the speckling and the Robin Eggs, the cake really started to come together.

So I hope you all enjoyed this post and I can’t wait to share even more of my favorite recipes and cake decorating tips very soon!

XOXO,

N

Fourth of July Flag Cake

Hey everyone!

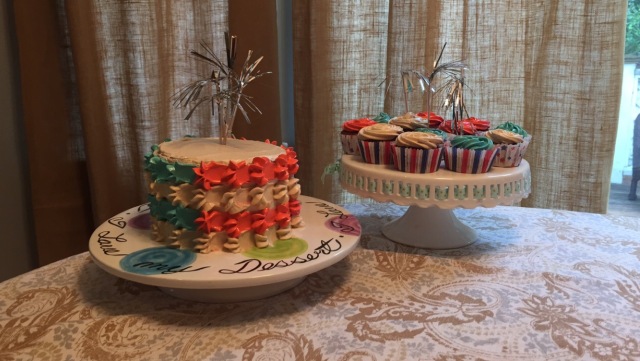
This Fourth of July I decided  to go all out by creating a patriotic cake and matching cupcakes. Although I didn’t make this particular cake from scratch, I really focused on the decorative aspects and fluffy, brown sugar frosting.

I love this frosting because it tastes like marshmallows and smells of molasses. As found on Pinterest, this frosting is great for decorating being it really stays in place on a cake. To make the cake look like an American flag, I separated the frosting into three separate bowls and dyed one bowl of icing blue, the second red, and kept the last bowl white.

Using another technique I found on Pinterest, I used three separate star tips and put each color of frosting into it’s own piping bag with a closed star tip. To read more about the technique I used, here’s the fabulous blog post about this amazing piping technique that I use all the time.

To tweak this however, I decided to add silver sparklers to the top of the cake to create the illusion of fireworks bursting out of the cake.

IMG_3284

With the cupcakes, I piped different colored rosettes on each cupcake. To do this, I started the tip of the piping bag in the center of the cupcake. To create rosettes, I swirled the frosting from the middle of the cupcake to the outer edge of the cupcake. By moving the icing from the center to the edge, rather than the outside of the cupcake to the center, I could create an elegant rose rather than add an overwhelming amount of frosting to each cupcake.

Finally, I should let you all know how I avoided getting the red velvet cake crumbs into the white frosting. By icing the cake in a crumb coat and refrigerating the dirty iced cake, the cake crumbs were unable to mix in with the frosting thus allowing for a neater, and more presentable cake.

So I hope these tips were helpful and I can’t wait to share more very soon!

XOXO,

N